# 1、安装
安装之前,需要确保Node.js的版本要在8或以上
# 1.1 全局安装
# 安装
npm install -g vuepress # 或者:cnpm install -g vuepress,yarn global add vuepress

# 创建项目目录并进入该目录
mkdir vuepress-starter && cd vuepress-starter

# 新建一个 markdown 文件
echo '# Hello VuePress!' > README.md

# 开始写作
vuepress dev .

# 构建静态文件
vuepress build .
2
3
4
5
6
7
8
9
10
11
12
13
14
# 1.2 本地安装
# 将 VuePress 作为一个本地依赖安装
npm install -D vuepress # 或者:cnpm install -D vuepress,yarn add -D vuepress

# 新建一个 docs 文件夹
mkdir docs

# 新建一个 markdown 文件
echo '# Hello VuePress!' > docs/README.md

# 开始写作
npx vuepress dev docs
2
3
4
5
6
7
8
9
10
11
如果你的现有项目依赖了 webpack 3.x,推荐使用 Yarn 而不是 npm 来安装 VuePress。因为在这种情形下,npm 会生成错误的依赖树。
接着在 package.json 中加入脚本
{
  "scripts": {
    "docs:dev": "vuepress dev docs",
    "docs:build": "vuepress build docs"
  }
}
2
3
4
5
6
开始使用:
# 开始写作
npm run docs:dev # 或者:yarn docs:dev

# 生成静态的HTML文件
npm run docs:build # 或者:yarn docs:build
2
3
4
5
# 2、目录结构
VuePress遵循约定大于配置的原则,推荐如下目录结构:

各目录及文件的作用:
docs/.vuepress: 用于存放全局的配置、组件、静态资源等。docs/.vuepress/components: 该目录中的 Vue 组件将会被自动注册为全局组件。docs/.vuepress/theme: 用于存放本地主题。docs/.vuepress/styles: 用于存放样式相关的文件。docs/.vuepress/styles/index.styl: 将会被自动应用的全局样式文件,会生成在最终的 CSS 文件结尾,具有比默认样式更高的优先级。docs/.vuepress/styles/palette.styl: 用于重写默认颜色常量,或者设置新的 stylus 颜色常量。docs/.vuepress/public: 静态资源目录。docs/.vuepress/templates: 存储 HTML 模板文件。docs/.vuepress/templates/dev.html: 用于开发环境的 HTML 模板文件。docs/.vuepress/templates/ssr.html: 构建时基于 Vue SSR 的 HTML 模板文件。docs/.vuepress/config.js: 配置文件的入口文件,也可以是YML或toml。docs/.vuepress/enhanceApp.js: 客户端应用的增强。
自定义 templates/ssr.html 或 templates/dev.html 时,最好基于默认的模板文件来修改,否则可能会导致构建出错。模板文件内容如下:
<!DOCTYPE html>
<html lang="en">
  <head>
    <meta charset="utf-8">
    <meta name="viewport" content="width=device-width,initial-scale=1">
    <title></title>
  </head>
  <body>
    <div id="app"></div>
  </body>
</html>
2
3
4
5
6
7
8
9
10
11
# 默认的页面路由
| 文件的相对路径 | 页面路由地址 |
|---|---|
/README.md | / |
/guide/README.md | /guide/ |
/config.md | /config.html |
# 3、基本配置
# 3.1 配置文件
所有VuePress相关的配置都放在 .vuepress 目录下,一个 VuePress 网站必要的配置文件是 .vuepress/config.js,它应该导出一个 JavaScript 对象:
module.exports = {
  title: 'Hello VuePress',
  description: 'Just playing around'
}
2
3
4
# 3.2 主题配置
要使用一个主题时,可以在.vuepress/config.js配置文件中添加theme字段:
module.exports = {
    //使用发布到npm上的主题
    theme: 'vuepress-theme-xx',
    //主题名以vuepress-theme开头的可以使用如下缩写
    theme: 'xxx',
    //适用于Scoped Packages
    theme: '@org/vuepress-theme-xxx',// 或者一个官方主题: '@vuepress/theme-xxx'
    //缩写
    theme: '@org/xxx'// 或者一个官方主题: '@vuepress/xxx'
}
2
3
4
5
6
7
8
9
10
# 3.3 常用配置
3.3.1 导航栏配置
在.vuepress/config.js配置文件中添加themeConfig,通过其中的nav来配置导航栏:
themeConfig: {
    nav: require('./nav')//通常会将导航栏的配置放在另一个文件中
}

//nav.js文件内容:
//exports一个数组
module.exports = [
    {
        //可多级嵌套
        //test为标签的文字内容
        text: '测试',
        //items为子标签列表
        items: [
            {
                text: '内部链接',
                items: [
                    //link为导航栏链接,会自动识别内部链接与外部链接
                    { text: '测试1', link: '/test/one' },
                    { text: '测试2', link: '/test/two' }
                ]
            },
            {
                text: '外链',
                items: [
                    { text: '阿里云', link: 'https://www.aliyun.com/' },
                    { text: '腾讯云', link: 'https://cloud.tencent.com/' }
                ]
            }
        ]
    }
]
2
3
4
5
6
7
8
9
10
11
12
13
14
15
16
17
18
19
20
21
22
23
24
25
26
27
28
29
30
31
3.3.2 侧边栏配置
在.vuepress/config.js配置文件中添加themeConfig,通过其中的sidebar来配置导航栏:
themeConfig: {
    sidebar: {
		'/frontend/': [
            ['', 'HTML'],
            'Sass',
            'Git'
        ],
        '/album': [
            ['', '写在前面'],
            '手绘',
            '板绘'
        ]
    }
}
2
3
4
5
6
7
8
9
10
11
12
13
14
# 4、静态资源
# 4.1 相对路径
在VuePress中,所有Markdown文件都会被webpack编译成Vue组件,因此在引用静态资源时更倾向于使用相对路径:

也可以使用 ~ 前缀来明确指出这是一个webpack的模块请求,这样将允许通过webpack别名来引用文件或npm依赖:


2
webpack的别名可以通过 .vuepress/config.js 中的 configureWebpack 来配置:
module.export = {
    configureWebpack: {
        resolve: {
            alias: {
                '@alias': 'path/to/some/dir'//某个路径
            }
        }
    }
}
2
3
4
5
6
7
8
9
# 4.2 公共文件
像favicons和PWA的图标等,并不直接被任何一个markdown文件或者主题组件引用的资源,可以放在 .vuepress/public 中,它们最终会被复制到生成的静态文件夹中
# 4.3 基础路径
当网站被部署到一个非根路径下,例如 https://eddievandeer.github.io/docs/,需要在 .vuepress/config.js 中设置 base 的值为 /docs/ (注意:/开头,/结尾)。 base 一旦被设置,将作为前缀插入到 .vuepress/config.js 中所有的以/开始的路径
VuePress还提供了一个内置的helper $withBase,可以生成正确的路径:
<!-- 在Markdown文件中也是如此 -->
<!-- 因为每一个Markdown文件将首先被编译成HTML,接着作为一个Vue组件传入vue-loader -->
<img :src="$withBase('/xxx.png')" alt="xxx">
2
3
# 5、部署到Github
步骤:
若要将博客发布到
https://<USERNAME>.github.io/<REPO>/仓库,需要在config.js中将base设置为"/<REPO>/"。使用Git新建一个分支gh-pages:
git branch gh-pages
配置
.gitignore文件,忽略node_modules目录和dist目录在项目中创建一个
deploy.sh文件:
#!/usr/bin/env sh

# 确保脚本抛出遇到的错误
set -e

# 生成静态文件
npm run docs:build

# 进入生成的文件夹
cd docs/.vuepress/dist

# 如果是发布到自定义域名
# echo 'www.example.com' > CNAME

git init
git add -A
git commit -m 'deploy'

# 如果发布到 https://<USERNAME>.github.io
git push -f git@github.com:<USERNAME>/<USERNAME>.github.io.git master:gh-pages

# 如果发布到 https://<USERNAME>.github.io/<REPO>
git push -f git@github.com:<USERNAME>/<REPO>.git master:gh-pages

cd -
2
3
4
5
6
7
8
9
10
11
12
13
14
15
16
17
18
19
20
21
22
23
24
25
- 使用Git将代码发布到主分支master上,并运行
deploy.sh文件的脚本,将编译后的文件发布到gh-pages分支:
git add -A
git commit -m "message"
git push
yarn deploy
2
3
4
TIP
完成以上步骤即可在 https://<USERNAME>.github.io/ 或 https://<USERNAME>.github.io/<REPO> 访问自己的博客网站了
# 6、自定义主题
# 6.1 目录结构
在 .vuepress 文件夹下创建 thmem ,目录结构如下:
theme
├── components 			//组件
├── global-components 	//全局组件
├── layouts				//布局
|   ├── Layout.vue		//主页布局文件
|   ├── AnotherLayout.vue
|   └── 404.vue
├── styles				//样式
|   ├── index.css
|   └── palette.styl	//调色板
├── index.js			//入口文件
└── enhanceApp.js		//客户端增强文件,可导入全局文件
2
3
4
5
6
7
8
9
10
11
12
创建完 thmem 目录后,即可在此目录中以平常开发vue项目的方式开发博客网站。开发完成后还可以将该 thmem 目录作为一个 Vuepress 主题包发布到 npm 上
通常一个主题项目命名通常为如下格式:vuepress-theme-name ,前面的 vuepress-theme 为固定格式,后面的 name 是你自己为这个主题起的名字。发布完成后可使用 npm i vuepress-theme-name -D 安装至博客项目,在博客项目的 .vuepress/config.js 文件中进行如下配置后即可生效:
module.exports = {
    // ...
    theme: 'vuepress-theme-vivek',
    themeConfig: {
        // Please head documentation to see the available options.
    }
}
// or
module.exports = {
    // ...
    theme: 'vivek',
    themeConfig: {
        // Please head documentation to see the available options.
    }
}
2
3
4
5
6
7
8
9
10
11
12
13
14
15
# 6.2 组件
在 components 目录下的.vue文件将会作为一般组件来使用,而 global-components 目录下的.vue文件将会被自动注册为全局组件,可以直接使用
# 6.3 布局
在 layout 目录下创建一个 Layout.vue 文件,Vuepress将会以此为首页布局来渲染 docs 根目录下的 README.md 文件
其他目录下的 README.md 文件需要添加Front Matter:
---
layout: ArticleDetail
---
2
3
以此来指定该页面要渲染在哪一个布局文件里
404.vue 文件将会在匹配不到相应路由时渲染,提示用户错误访问
# 6.4 配置
在 index.js 文件下可以配置要使用的插件,使用方式:
module.exports = {
    //配置网页图标
    head: [
        ['link', {
            rel: 'icon',
            href: '/assets/icon/favicon.ico'
        }]
    ],
    //配置插件
    plugins: [
        'vuepress-plugin-container',
        ['@vuepress/search', {
            searchMaxSuggestions: 10
        }],
        '@vuepress/back-to-top',
        '@vuepress/nprogress'
    ]
}
2
3
4
5
6
7
8
9
10
11
12
13
14
15
16
17
18
在 enhanceApp.js 文件下可以进行应用级别的优化,使用方式:
//导入全局使用的文件
import '@theme/styles/main.scss'
import 'font-awesome/css/font-awesome.min.css'
import 'prismjs/themes/prism-tomorrow.css'

export default ({
      Vue, // VuePress 正在使用的 Vue 构造函数
      options, // 附加到根实例的一些选项
      router, // 当前应用的路由实例
      siteData, // 站点元数据
      isServer // 当前应用配置是处于 服务端渲染 或 客户端
}) => {
      // ...做一些其他的应用级别的优化
}
2
3
4
5
6
7
8
9
10
11
12
13
14
# 7、使用Github Actions持续集成服务
创建仓库后,仓库顶部的菜单会出现 Actions 一项,如下图所示:

使用该服务需要 GitHub 密钥,参照官方文档来生成一个密钥
生成完密钥后,进入到Settings下的Secrets,点击右上角的按钮将密钥储存到当前仓库的 Settings/Secrets 里面
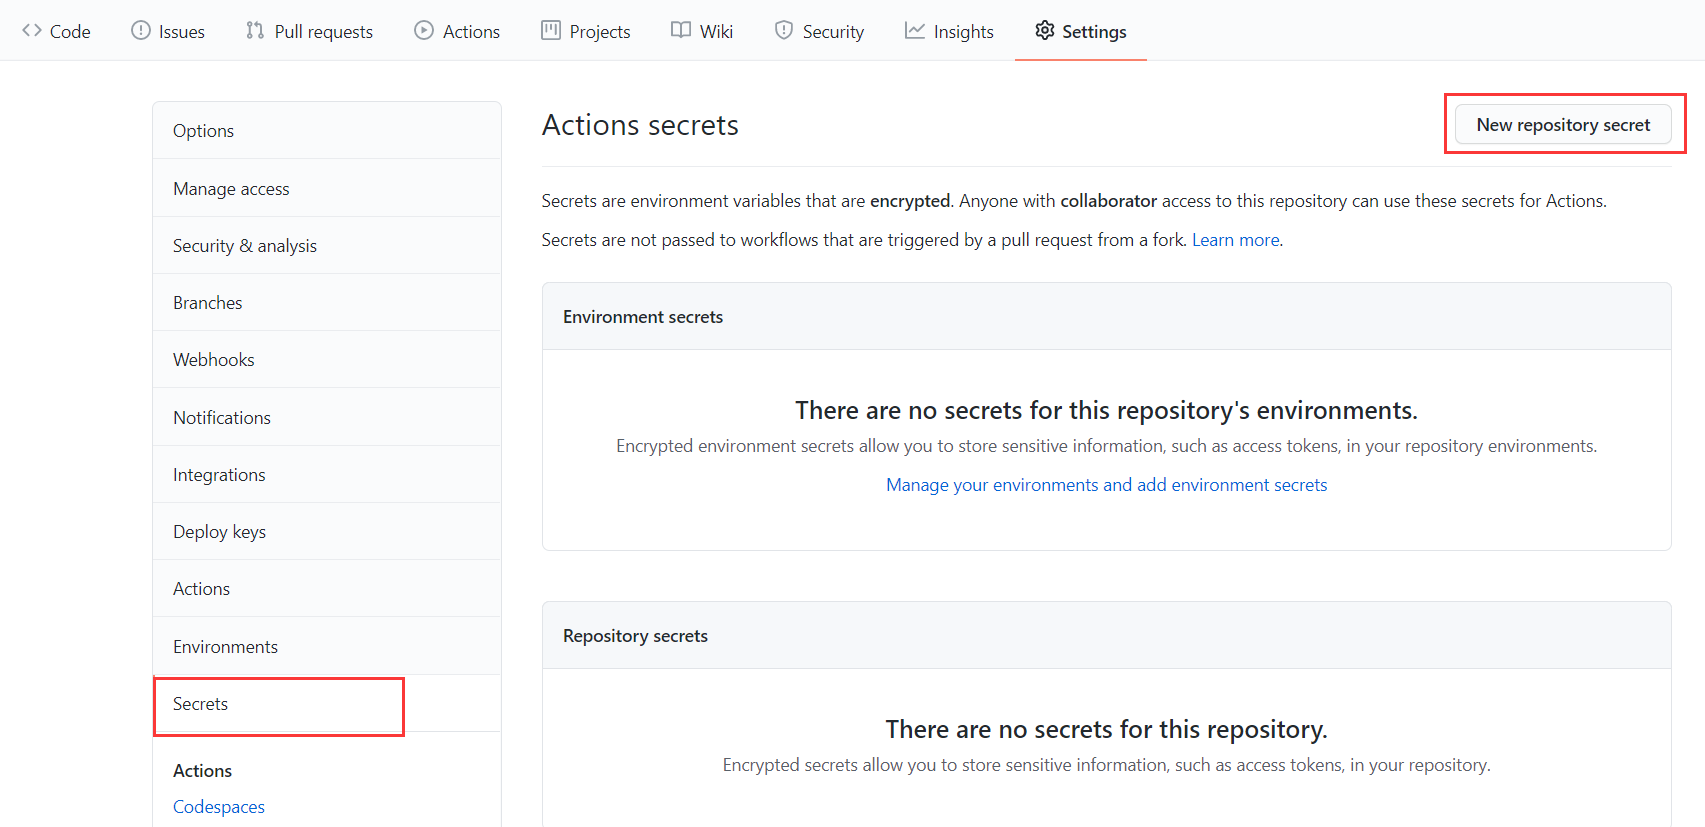
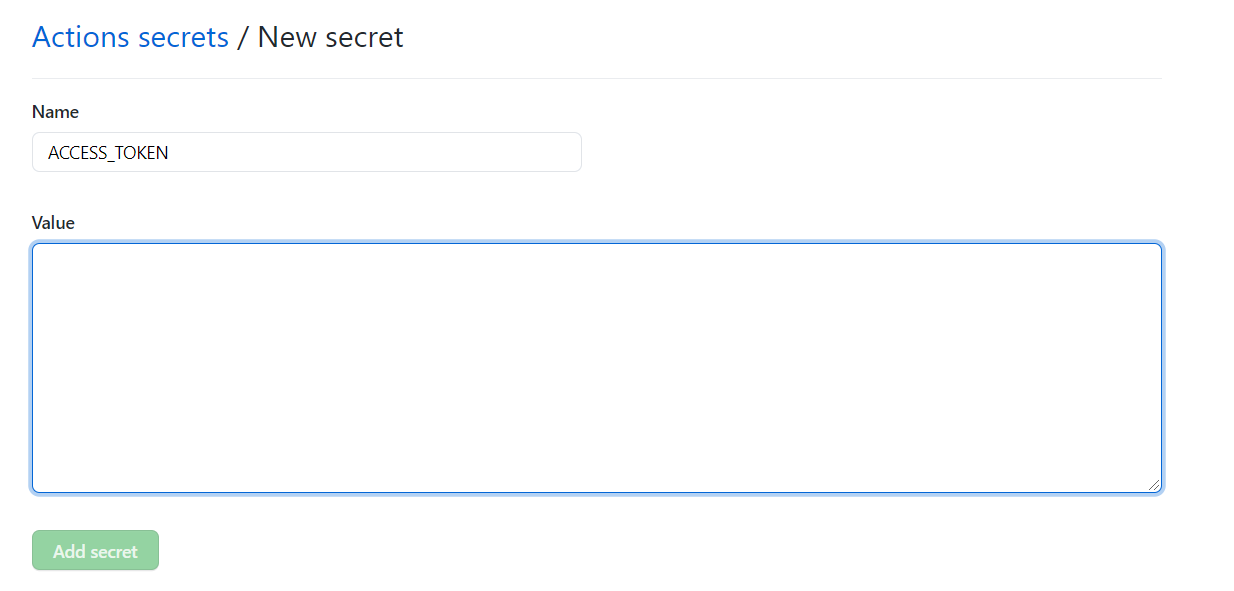
这个环境变量的名字可以随便起,这里我用的是 ACCESS_TOKEN ,如果命名和我不一样,则在后续的脚本编写中,变量的名字也要换成自己的变量名。在Value中填入刚刚生成的密钥内容,然后点击 Add secret 添加环境变量
打开项目根目录下的 package.json 文件,添加一个 homepage 字段,以此来指定项目发布后的根目录
"homepage": "https://[username].github.io/[repository]"
在项目根目录下创建 .github/workflows 目录,在目录下创建一个 .yml 文件,该文件的命名没有要求,文件内容可参考如下我使用的 Action :
name: Build and Deploy
on: [push]
jobs:
  build-and-deploy:
    runs-on: ubuntu-latest
    steps:
      - name: Checkout 🛎️
        uses: actions/checkout@v2 # If you're using actions/checkout@v2 you must set persist-credentials to false in most cases for the deployment to work correctly.
        with:
          persist-credentials: false

      - name: Install and Build 🔧
        run: |
          npm install
          npm run docs:build
        env:
          CI: false

      - name: Deploy 🚀
        uses: JamesIves/github-pages-deploy-action@releases/v3
        with:
          GITHUB_TOKEN: ${{ secrets.ACCESS_TOKEN }}
          BRANCH: myblog
          FOLDER: docs/.vuepress/dist
2
3
4
5
6
7
8
9
10
11
12
13
14
15
16
17
18
19
20
21
22
23
24
此处我是将编译后的应用放在了 myblog 分支上,如有需要可以自行更改倒数第二行的 BRANCH 的值
最后使用 git add .,git commit -m "message",git push 将项目提交,即可在每次提交的时候执行上述的 Action ,将源项目编译后提交至myblog分支上,设置Github Pages的Source为提交的分支,即可在 https://[username].github.io/[repository] 上访问到搭建的博客网站